
From Concept to Stitch: How We Produce and Ship Custom Patches
Table Of Content
- The First Step: We Turn Your Idea into a Patch Design
- Gather Client's Requirement
- Digitizing Artwork for Embroidery
- Stitching the Patch: How the Embroidery Software Gives New Life to Your Design
- Our Step-by-Step Embroidery Patch Process
- Importing the Artwork
- Setting Up the Design
- Assigning Stitch Types
- Setting Stitch Directions and Density
- Adding Colors and Layers
- Preview and Final Adjustments
- Shipping and Packaging: How Customized Patches Get to You
- Summary
Custom patches are more than just a piece of cloth with embroidery on it. They give flair to simple clothes, represent a team or help build a brand. We at Digitizing USA follow a precise procedure that ensures each patch we produce fulfills demanding requirements for complexity, durability and design. This guide explains the custom patches production process step by step, from your idea to the moment your patches arrive at your door.
The First Step: We Turn Your Idea into a Patch Design
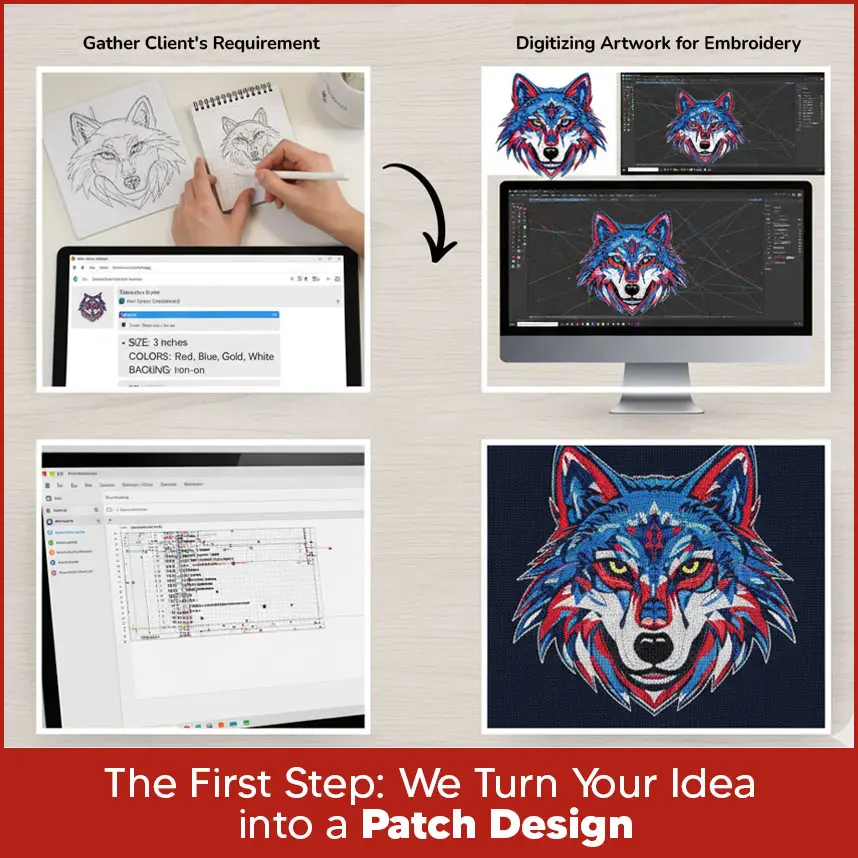
Every patch process begins with an idea. You may have a rough sketch, a logo or just a rough concept in mind. Our goal is to bring that idea to life in a way that works for embroidery.
Gather Client's Requirement
The process begins with clear communication. We collect details about your patch, including design type, size, color preferences and more. These inputs help us set up the design in embroidery software correctly.
For example, when we know the patch size and color scheme, we can define the design area, adjust stitch density and match thread shades in the software. By understanding these requirements early, we prepare the base for accurate digitizing before moving to the stitching stage.
Digitizing Artwork for Embroidery
Once we have your design, the next step is digitizing. Embroidery digitizing is the process of converting artwork into a format that embroidery machines can read. Instead of simple images, the file is turned into stitch data that guides the machine. Every line, curve and color is mapped with precision so that the final patch looks sharp and professional.
Stitching the Patch: How the Embroidery Software Gives New Life to Your Design
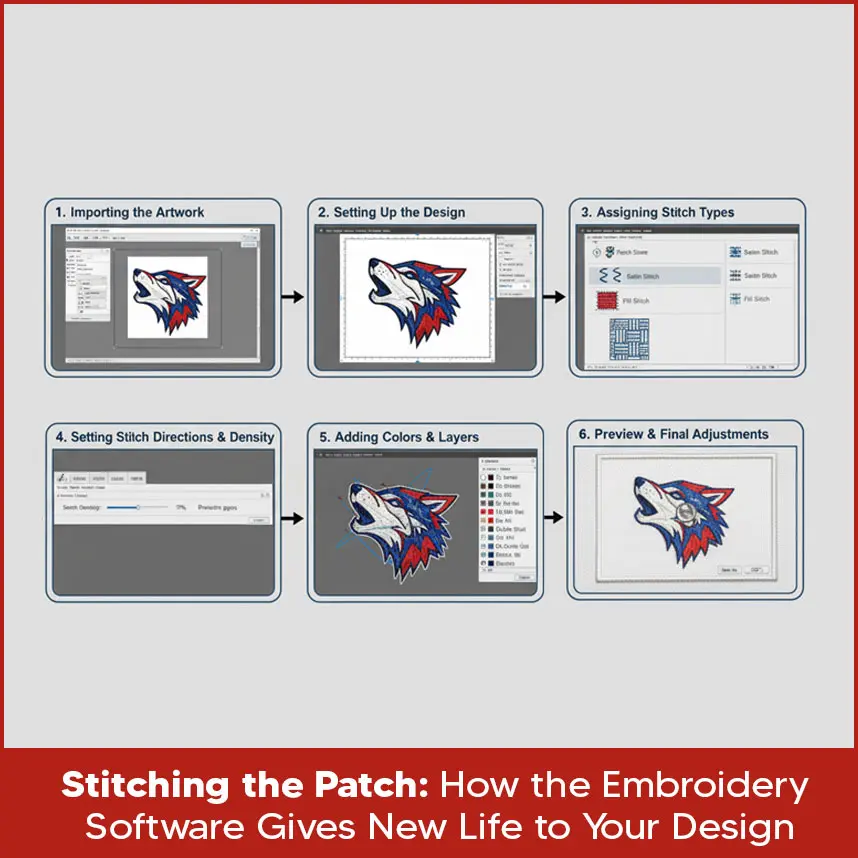
After digitizing, the design is ready to be stitched. This stage brings the patch to life, transforming digital design into real embroidery.
Our Step-by-Step Embroidery Patch Process
Below are our clear steps on how we turn your artwork into a ready-to-stitch patch file. Each step shows what our team does with embroidery software to ensure precise, high-quality results.
Importing the Artwork
We import your logo or artwork into our embroidery software. Most files are JPG, PNG, or PDF. The software displays the image, which will later be converted into a stitch file. We make sure the artwork is resized and adjusted so it fits perfectly as a patch.
Setting Up the Design
We define the design area in our software. This includes the patch size, intended placement, and fabric parameters used for digitizing. This setup guides our digitizing work so stitches keep the design’s detail and proportions when embroidered.
Assigning Stitch Types
In software, our digitizers assign stitch types for each part of the design. For example, we use satin stitches for text and borders and fill stitches for larger areas. Choosing the right stitch type in our software helps the patch look clean and professional on fabric.
Setting Stitch Directions and Density
We set stitch directions and adjust stitch density in our design file. Stitch direction controls how thread lies across the design and density controls how tight the stitches are. With these settings in our software, we prevent gaps and keep the patch durable without making it too heavy.
Adding Colors and Layers
We match thread colors using our color library and arrange colors in ordered layers in the software. Our team places lighter colors first and adds darker outlines later. Careful layering in our file stops overlaps and keeps the final patch neat.
Preview and Final Adjustments
We use our software’s preview to check how stitches will look. If any area looks too dense or uneven, our digitizers make final adjustments. Once everything is done, we save the design in the file format required by the embroidery machine.
Shipping and Packaging: How Customized Patches Get to You
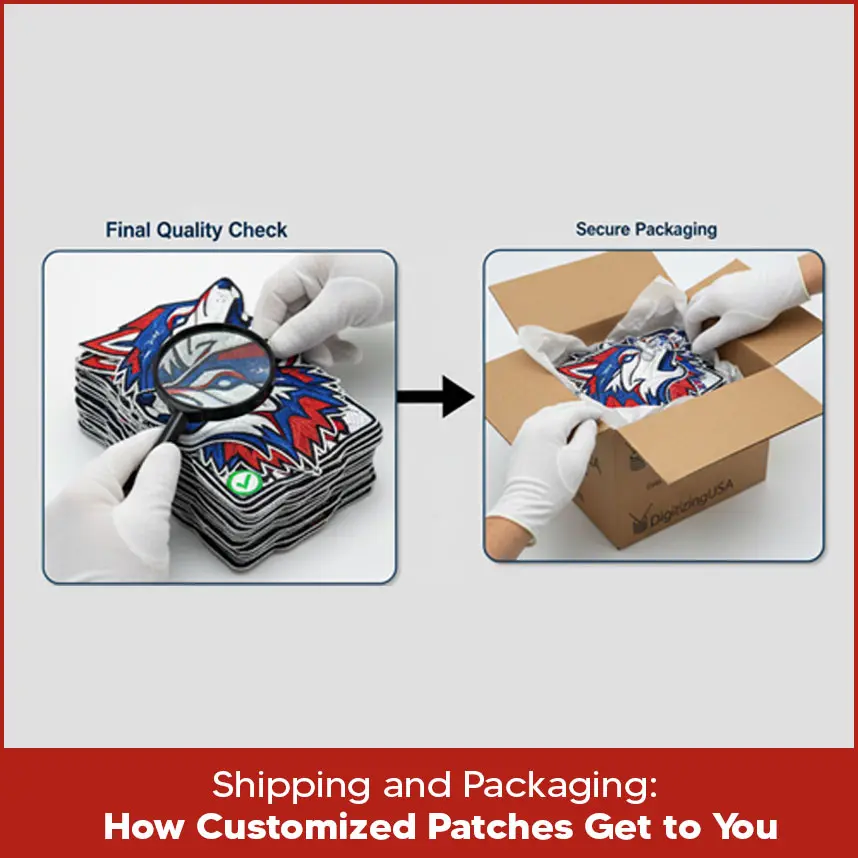
A final quality check takes place after the patches are finished. Every patch is closely checked to make sure that the stitching, finishing and color accuracy are correct. Only after passing this check are the patches safely packaged for shipment.
The process of digitizing at Digitizing USA normally takes 2 to 6 hours, depending on how complicated the design is. It can exceed 12 hours for complex artwork. After digitizing, shipping is set. Depending on their location and preferred shipping method, customers receive their order in 8 to 12 business days. The patches will be sure to arrive in perfect shape and ready for use due to secure packaging. The process of creating custom patches begins with a concept and finishes with a completed patch in your possession. At Digitizing USA, we handle every step: paying attention to what you need, accurately digitizing, stitching and delivering on time. If you want patches for your team, company or for personal use, the procedure is always the same: easy, dependable and professional. Digitizing USA converts your idea into long-lasting stitches if you're seeking well-crafted personalized patches. So contact us now.Summary
Related Blogs


