
Understand Pull and Push Compensation: Why Letters Look Uneven in Embroidery
Table Of Content
- Understand What Push Compensation is
- What is Pull Compensation?
- When & Where Pull Compensation Matters Most?
- Factors That Affect Pull Compensation
- Lettering Pull & Push Compensation
- Let’s Try to Understand Why Letters Look Uneven in Embroidery
- 1. Fabric Type Settings in Software
- Solution
- 2. Density and Underlay Adjustments
- Solution
- 3. Pull and Push Compensation Settings
- Solution
- Summary
Embroidery is a combo of creativity and the right use of stitches, along with fabric behavior and machine adjustments. Many people face a common issue when they stitch text or small designs, letters do not look even. Sometimes, the sides of letters appear stretched, while other times the shapes look narrower than expected. This is where the concept of pull and push compensation in embroidery comes in.
If you are new to embroidery digitizing or even if you have some expertise, knowing pull and push compensation is so important because it saves your time, reduces effort and wasted material. Let's go through this guide in detail and understand why they are so important in letters.
Understand What Push Compensation is
Push compensation happens when the stitches in your design naturally spread outward as they are sewn. This is because thread takes up space and as the needle enters the material, the stitches push the material forward. For example, in vertical satin stitches, the bottom part of the stitch tends to push out more than the top.
To balance this, digitizers add extra space to the opposite side of the design. This ensures that once the fabric and thread settle, the design looks exactly as you want. Without push compensation, shapes like circles, rectangles or vertical columns mostly appear distorted.
What is Pull Compensation?
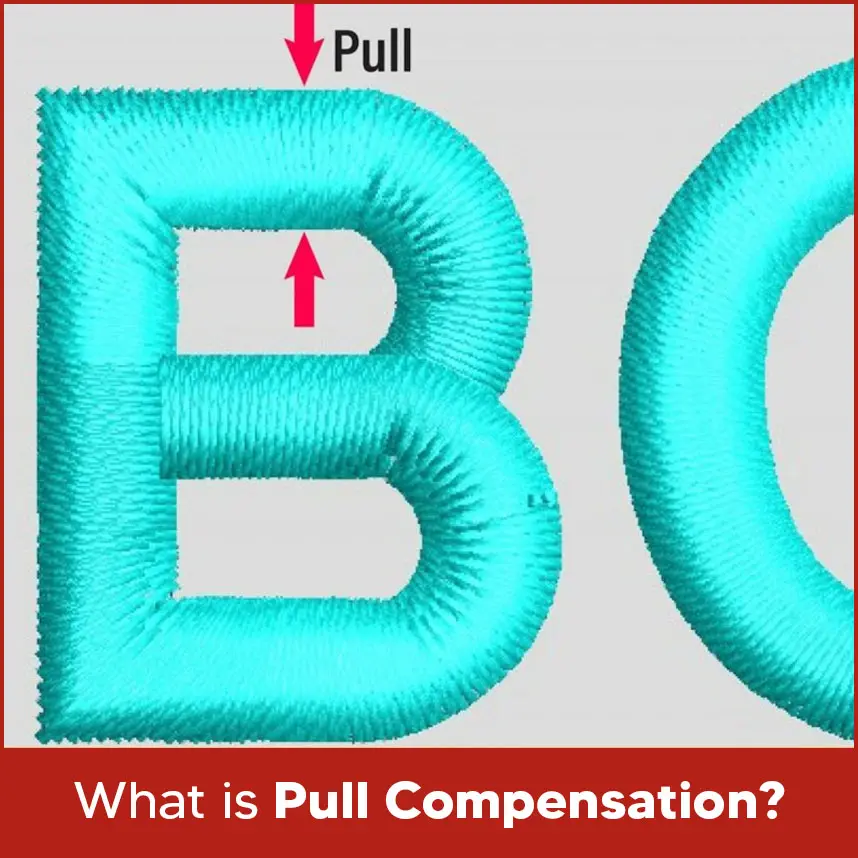
Pull compensation is about adjusting designs to prevent stitches from narrowing. When thread pulls tight during embroidery, it reduces the design’s actual width. Imagine sewing the letter “O.” Instead of a perfect round shape, it might look thin or slightly squashed.
To fix this, digitizers widen certain parts of the design. The extra width makes up for the pulling effect, so the final stitched letter looks balanced and sharp. Pull compensation is especially important in small lettering and thin satin stitches.
When & Where Pull Compensation Matters Most?
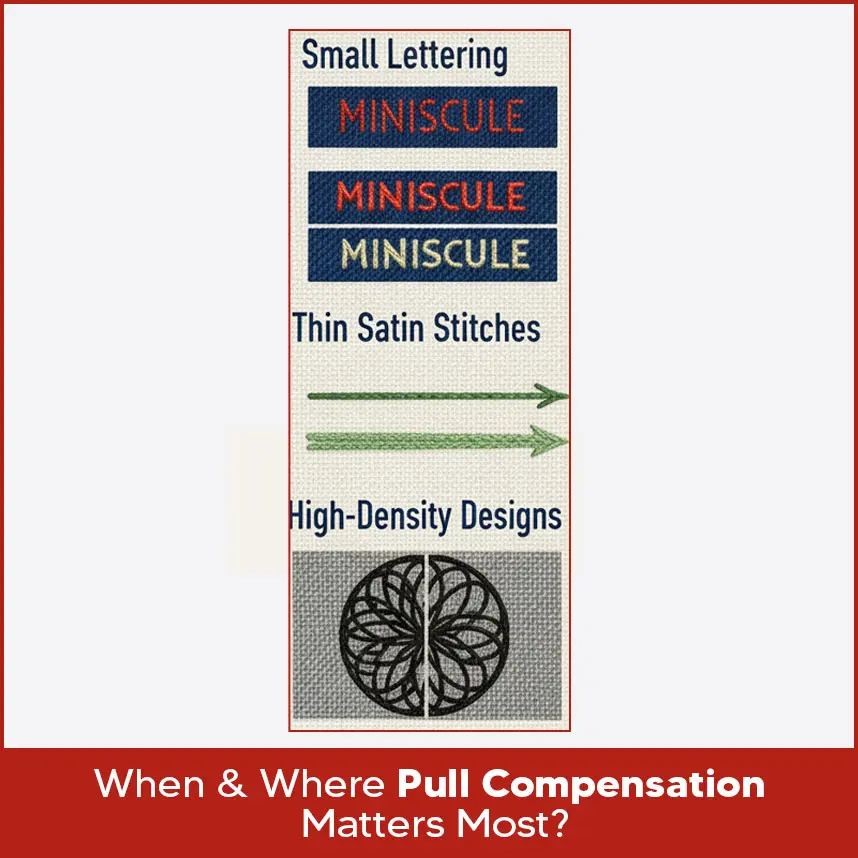
Pull compensation plays a major role in these areas:
- Small lettering: Tiny letters are the most affected by thread pull. Without compensation, they often look unreadable.
- Thin satin stitches: Narrow satin stitches shrink easily, which is why extra width is added.
- High-density designs: When many stitches are found in one place, the pull effect is stronger, so compensation becomes necessary.
In short if your embroidery involves text, logos or fine details, pull compensation should always be considered.
Factors That Affect Pull Compensation
Not every fabric or thread reacts in the same way. Here are a few factors that affect how much pull compensation is needed:
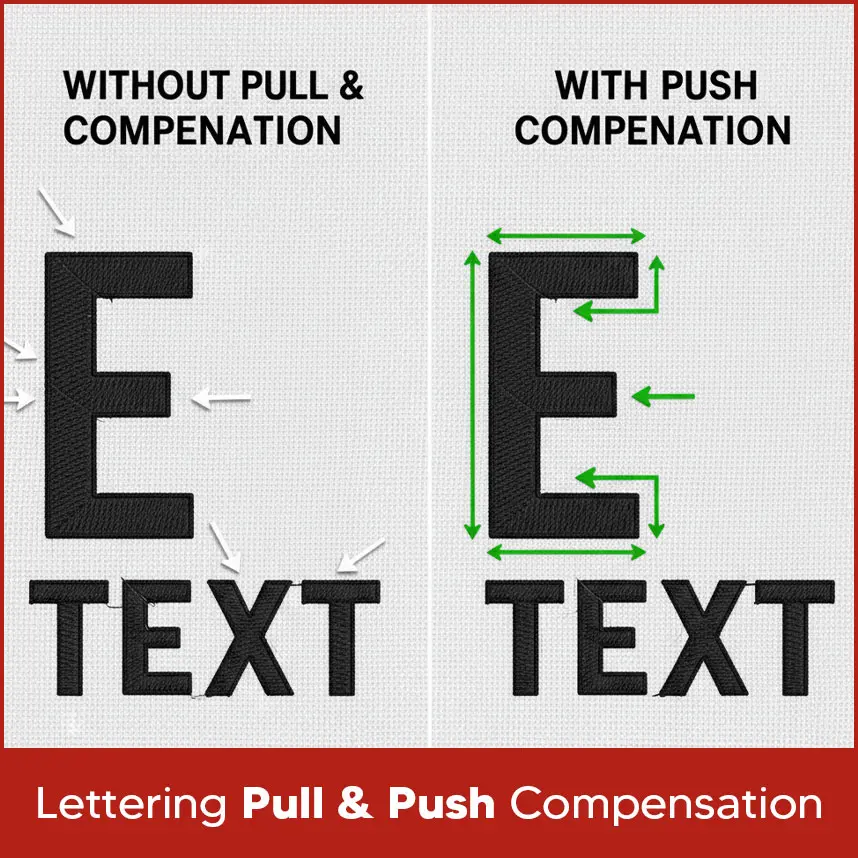
- Fabric type: Stretchy fabrics like knits pull more than stable fabrics like twill. - Thread thickness: Thicker threads create stronger pull, while thinner threads may need less adjustment. - Stitch density: High-density stitching increases pull, while lower stitch density reduces it. - Machine speed: Fast stitching can stretch fabric more than slower stitching. Digitizers usually test their designs to measure how much compensation is required. Text is one of the trickiest parts of embroidery. When letters are digitized without proper pull and push adjustments, they can look uneven or even unreadable. For example: 1. The vertical parts of letters may look thinner. 2. The horizontal parts may stretch too far. 3. Rounded letters may lose their smooth shape. By applying both pull and push compensation, digitizers make sure letters look uniform. The idea is to plan ahead so the final result matches the original design. Most of the time uneven letters are caused by how a design is digitized in embroidery software. Even if the design looks perfect on your computer screen, the stitched result can turn out different. This happens because embroidery is not only about shapes and stitches but also about how software settings prepare the design for real fabric and thread. Below are the main reasons letters look uneven in embroidery and also discuss solutions to avoid them. Most embroidery software programs have features that allow you to select the fabric type before you start digitizing. This step is important because stitches behave differently on knit, denim, canvas, or polyester. If you skip this adjustment, the design may stitch unevenly, especially with small letters. 1. Always select the right fabric profile before digitizing. 2. Use underlay settings (such as center run or zig-zag) to stabilize the design digitally. 3. Preview the design with 3D simulation to check how letters may shift. Stitch density is controlled in embroidery software. If density is set too high, the thread pulls the fabric tightly, making letters look narrow. If it’s too low, letters may appear loose and uneven. Underlay also matters because it supports the top stitches and keeps letters in place. 1. Adjust density according to the fabric type selected. 2. Use edge-walk underlay for small or thin letters. 3. Avoid excessive density in small lettering, as it increases pulling. Pull and push compensation is a key feature in embroidery software. Without proper values, letters lose their intended shapes when stitched. For example, the letter “O” may look more like an oval or vertical strokes may look thinner. 1. Set pull compensation values (usually 0.1mm to 0.4mm, depending on fabric). 2. Use auto-compensation features if the software offers them. 3. Manually adjust columns in letters that tend to shrink more during stitching. Pull and push compensation in embroidery is not just a technical adjustment, it is the reason your letters look neat, clean and professional. By planning for fabric behavior and thread movement, digitizers prevent designs from shrinking, stretching or looking uneven. If you want embroidery that looks sharp on hats, shirts, jackets, or any fabric, working with an experienced digitizing service makes a big difference. At Digitizing USA, we make sure every design is adjusted with proper pull and push compensation. This ensures your logos and text stitch out perfectly, no matter the fabric or thread type. Get started today with Digitizing USA and enjoy high-quality embroidery files that run smoothly on your machine.Lettering Pull & Push Compensation
Let’s Try to Understand Why Letters Look Uneven in Embroidery
1. Fabric Type Settings in Software
Solution
2. Density and Underlay Adjustments
Solution
3. Pull and Push Compensation Settings
Solution
Summary


