
How to Fix Registration Errors in Embroidery Designs?
Table Of Content
- Why Registration Errors Happen?
- How to Fix Registration Problems Early?
- Check Your Hooping First
- Use the Right Stabilizer for Your Fabric
- Fix Thread Tension Issues
- Slow Down Your Machine Speed
- Recheck Your Design Quality
- Use Basting Stitches Before Starting the Design
- Prevent Fabric Stretching During Stitching
- When to Edit or Re‑digitize the Design
- Tips to Avoid Registration Errors Every Time
- Summary
You finish embroidery designs and find the outlines or elements don’t line up exactly as you wanted? That moment when you lift the hoop and see that second or third color is slightly shifted, yes, that’s a registration error. It’s confusing and disturbing, especially when you’ve spent many hours, materials and effort into a project. Registration errors in embroidery mean that one part of the design doesn’t stitch in exactly the right place relative to another part.
In this blog we’ll cover why this happens, how to spot it early and step‐by‐step ways to fix it so you can get back to smooth, accurate stitching.
Why Registration Errors Happen?
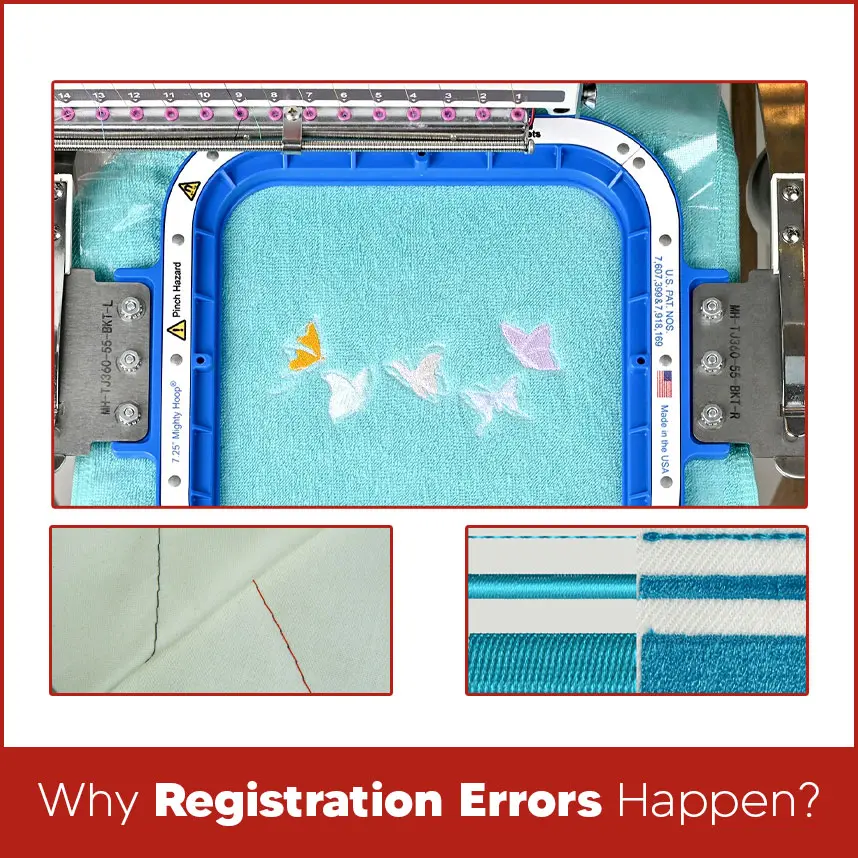
Registration errors don’t happen for just one reason. A number of factors play a part:
- The fabric may shift or stretch under the hoop.
- The stabilizer might not be right for the fabric or design.
- Thread tension might be off so the machine pulls fabric differently. - The hoop may not be secure or square. - The digitized design might not account for the fabric type or stitch density. Understanding these root causes helps you fix the specific problem rather than chasing it blindly. Catching the issue early saves time and reduces waste. Here are key signs to watch for: - After finishing the first color run, the next color looks slightly off, e.g, edges don’t align. - On a registration test (if your machine supports it), lines meant to overlap do not match exactly. - Fabric distortion around the design (puckering or stretching) suggests the fabric moved. - The design looks good on one fabric but fails on another substrate. If you notice any of these, pause the project and check, don’t just keep sewing more items with the same setup. Before changing anything big, start with the hoop. Improper hooping is the most common issue. - Always make sure the fabric is flat, wrinkle free and square inside the hoop. - The hoop should be tightened but not so tight that it damage the fabric. - Check the alignment: is the fabric placed the same way as in your test? If you’re using a cap driver, make sure the cap is seated and clipped correctly. As one machine knowledge base indicates, hoop arm clip adjustment,backing check and hooping are key steps when registration issues appear. When the hooping is inconsistent, the fabric can shift or pull during stitching, causing the next colors to misalign. The stabilizer is the main and most important part of embroidery. The wrong type or weight can lead to movement and mis‑registration. - For heavier fabrics like denim or fleece, a firm cut‑away stabilizer helps hold the stitches in place. - For lightweight or stretchy fabrics, use a lighter weight or mesh stabilizer so the design doesn’t pull the fabric. - Make sure the stabilizer covers the full area of the design and is hooped together with the fabric or at least secure underneath. Note: Match your stabilizer to both the fabric and the design’s stitch count. Even when everything else seems correct, thread tension can sneakily cause registration errors. Here’s how: - If the top thread tension is too tight, the fabric may pull or pucker under the stitching. - If too loose, the stitches may not lie flat and can shift as the machine continues sewing. - Check the bobbin thread too, imbalanced tension between top and bobbin threads can impact registration. So grab a scrap of similar fabric, hoop it, stitch a test design and check alignment before starting your project. Speed is hard to resist, finish more pieces faster, increase output, right? But when registration errors are creeping in, slowing down may actually fix more than you expect. - Higher machine speeds increase the chance that the fabric or hoop shifts slightly under the foot or arm. - At slower speeds, the fabric stays more stable, and the machine has more control of each stitch placement. - Use your machine’s test or troubleshooting mode (if available) to check registration at a lower speed first before full‑production runs. This little adjustment solves alignment problems without needing major changes. At this point, you’ve checked the hoop, stabilizer, tension and speed. If you still see registration errors, the design itself may need review. Was the digitizer aware of the fabric type and stabilizer being used? “Don’t automatically blame digitizing” but recognize that design to substrate mismatch is often the root. Has the design been resized or altered after digitizing? Resizing can change stitch density, direction and how layers overlap, leading to misregistration. If the design is for one fabric type (e.g, twill) and you’re using it on another (e.g., sheer knit), you may need a separate version. In short, a great setup needs a great design file that is intended for the exact conditions you’ll use. - Basting stitches are an underrated tactic, especially in challenging fabrics or large designs. - Basting stitches hold the fabric and stabilizer together firmly before the actual design runs. - These stitches can prevent shifting or puckering during multiple color changes or heavy fill areas. - After basting, start stitching the actual design without removing the hoop. - Using basting helps lock everything in place so the next color line up as expected. Stretchy or knit fabrics are especially vulnerable to registration errors. Here’s how to limit problems: - Use a stabilizer that supports the fabric without making it stiff (especially knits). - Hoop carefully, avoid stretching the fabric during hooping. If it’s tight, it may release tension and shift when stitching. - Use a topping or water‑soluble stabilizer for fabrics with nap or pile like terry cloth or fleece so the needle doesn’t drag the fabric. - After stitching, remove the hoop immediately, so the design doesn’t distort as the fabric relaxes. These steps help maintain the fabric in its natural state during stitching, which supports registration accuracy. Sometimes you’ve done everything right and registration errors still appear. That’s the moment to consider editing or re‑digitizing. - If the design has been resized (up or down) beyond what the digitizer recommended, ask for a new version rather than relying on the same file. - If you changed fabric types, stabilizer or needle size significantly from the original test condition, the file may need adjusting. - If the design uses overlapping layers incorrectly, causing one layer to push another out of place, editing is needed. For large or complex designs with many color changes or heavy fills, a design optimized for caps vs shirts may differ. At this point, it’s a wise investment: a properly digitized file saves time, frustration and ruined fabric in the long run. Let’s wrap up with a checklist you can keep handy for every project: - Use consistent fabric, stabilizer and hooping method as your test sew‑out. - Hoop carefully, avoid fabric distortion, square and flat. - Choose the right stabilizer for the fabric and design. - Check and adjust thread tensions (top and bobbin). - Run a test at a slower speed and check registration before starting your main design. - Confirm the design file matches your fabric and stabilizer setup. - Use basting stitches when working with tricky fabrics or large designs. - Avoid stretching the fabric during hooping; use topping when needed. If you see repeat misalignment, consider re‑digitizing the design rather than forcing it to work. Keep this checklist before each project and you’ll greatly reduce registration problems. In embroidery, registration errors are so disturbing and annoying but they don’t have to ruin your project. By checking hooping, stabilizer, tension, speed and design quality, you can methodically track down the root cause and fix it easily. If you find that the design file itself needs adjusting, then investing in a fresh digitized version pays off big. Want to get professional embroidery digitizing services? You can contact the expert team of Digitizing USA. Our team understands design complexity deeply so you will get perfect desings every time. Visit Digitizing USA today.How to Fix Registration Problems Early?

Check Your Hooping First
Use the Right Stabilizer for Your Fabric
Fix Thread Tension Issues
Slow Down Your Machine Speed
Recheck Your Design Quality
Use Basting Stitches Before Starting the Design
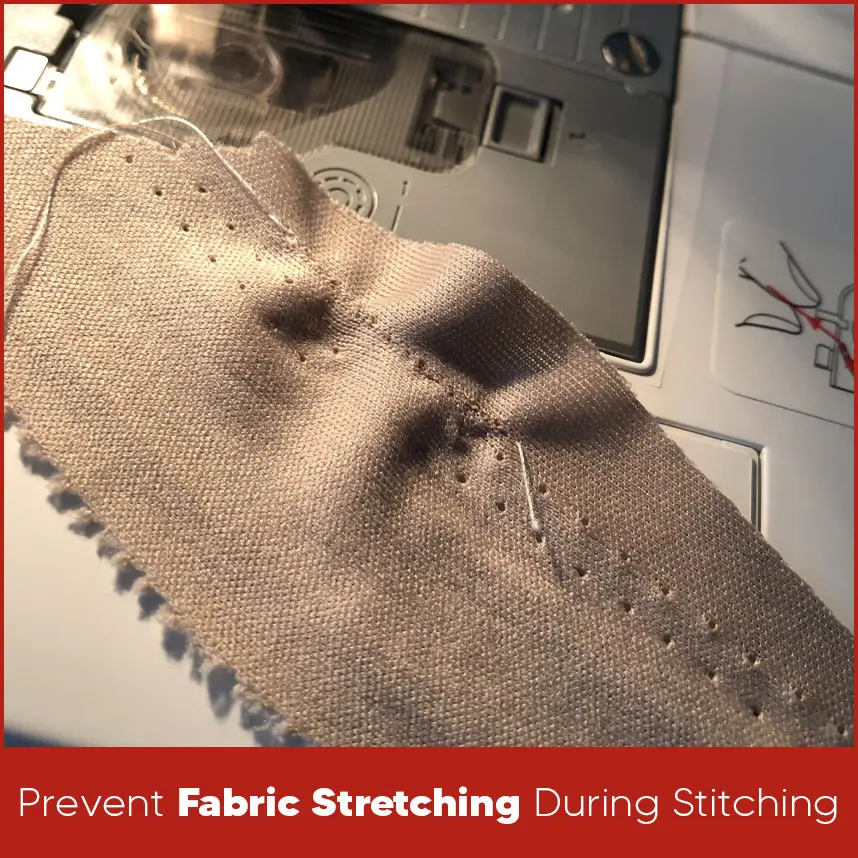
Prevent Fabric Stretching During Stitching
When to Edit or Re‑digitize the Design
Tips to Avoid Registration Errors Every Time
Summary


